
Fix Click Post CSV import errors: address fields, encoding, and postal codes
When a CSV import fails, check the screen message and affected rows, then compare the column order, encoding, and required fields with Japan Post's template. Japan Post does not publish error-frequency data, so this guide does not rank causes. The before-and-after examples below are fictional. For the full workflow, also see the Shopify × Click Post shipping guide.
Check the official CSV requirements
Click Post's Bulk Application uses the official CSV template. Keep its column names and order. The official CSV guide lists these main requirements:
| Field | Official requirement |
|---|---|
| Postal code | 7 half-width digits without a hyphen, or 7 half-width digits plus one half-width hyphen (8 characters total) |
| Recipient name | Required; up to 20 full-width or 40 half-width characters, excluding the honorific |
| Honorific | “Sama” or “Onchū” |
| Address lines 1–4 | At least one is required; each allows 20 full-width or 40 half-width characters |
| Contents | Required; up to 15 full-width or 30 half-width characters |
| CSV | CSV text in Shift-JIS; up to 40 items per upload |
The guide also says not to change the template's header row. If you start with data exported from Shopify or another system, match the field names, column order, and character limits before uploading.
Correct errors using examples
These before-and-after examples are fictional. They are not actual error messages or real addresses.
| Check | Fictional example before correction | Fictional example after correction |
|---|---|---|
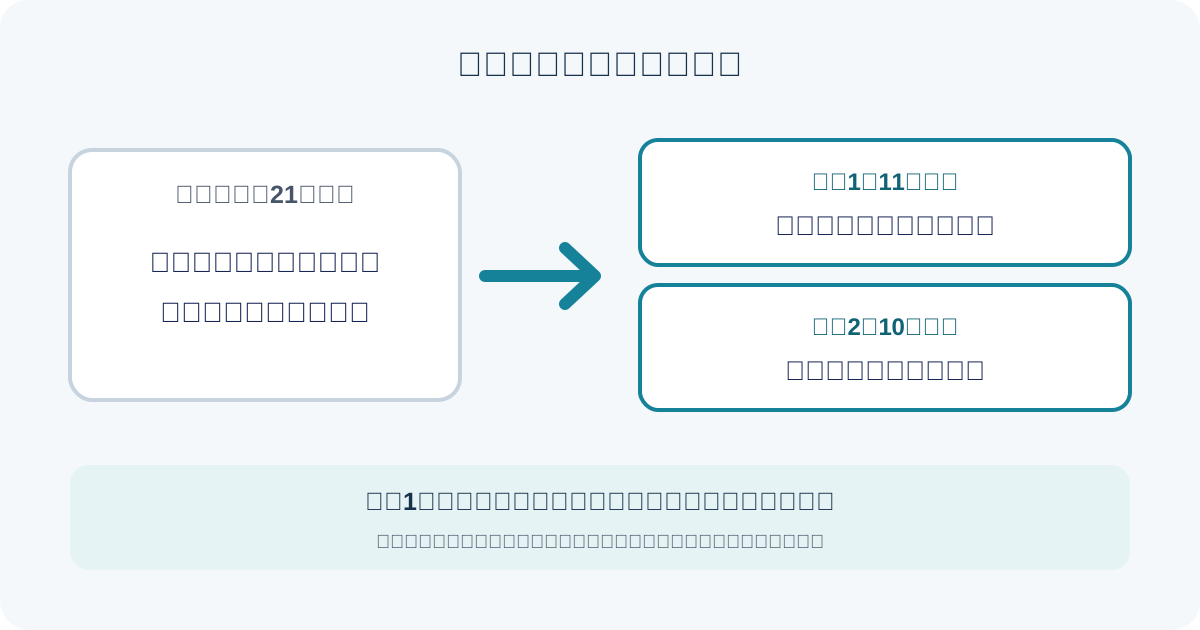
| Address field | Put a fictional Japanese address with 21 full-width characters entirely in address 1 | Preserve all parts: put the first 11 characters (prefecture, city, and town) in address 1 and the 10-character building name in address 2. Joining them in order reproduces the original address; check each field’s limit |
| Postal code | Full-width digits and a full-width hyphen | 7 half-width digits without a hyphen, or 7 half-width digits plus one half-width hyphen (8 characters total) |
| Encoding | Saved as UTF-8 | Saved as Shift-JIS as specified by the official guide |
| Column order | Reordered columns | Keep the official template's header and column order |
Do not delete street numbers, building names, or other address details to fit a field limit. Join the fields in order and check that they reproduce the original address and remain clear for delivery. For more address-field examples and checks, see How to prevent Click Post address errors.
Prepare the CSV and submit a Bulk Application
1. Identify the scope of the import error
In Click Post's Bulk Application screen, check whether the whole file failed or only particular rows. Use the message and affected rows to compare the file with the official template.
2. Check the CSV format, encoding, and header
Confirm that the file is CSV text in Shift-JIS. Check that columns were not added, removed, or reordered, and that the header names were not changed.
3. Check required fields and field lengths
Check the postal code, recipient name, at least one address field, and contents. Address lines 1–4, the name, and contents each have character limits in the official guide. Split long addresses across fields while keeping them readable.
4. Check postal-code digits and hyphens
Use 7 half-width digits without a hyphen, or 7 half-width digits plus one half-width hyphen (8 characters total). Replace any full-width digits or hyphens.
5. Split uploads above 40 items
One upload allows up to 40 items. For 41 or more, split the order rows so each file contains no more than 40, then upload the files separately. Compare order numbers and counts afterward to look for omissions or duplicates. For detailed CSV-splitting and bulk-application steps, see How to use Click Post’s Bulk Application.
Export CSV from Shopify and register tracking numbers
The Shopify listing for Instant Ship! for Click Post describes CSV export from selected Shopify orders and automatic address splitting. Check the exported order details and the official template requirements before uploading. The listing does not say that the app automatically splits CSVs into groups of 40, so split files yourself when needed.
After Click Post creates the shipping labels, upload the original label PDF issued by Click Post to the app. Review the candidate tracking numbers and their order matches shown by the app, then confirm registration to the corresponding Shopify orders. See the app guide for the listed features.
Frequently asked questions
What is the most common cause of a Click Post CSV import error?
Japan Post does not publish data showing error frequencies, so we cannot rank the causes. First, read the on-screen message, then check the official template's column order, Shift-JIS encoding, required fields, and address-field character limits.
Can I upload a Shopify CSV to Click Post without changes?
Not necessarily. Match the exported fields to the Click Post template's columns and requirements, then save it as CSV text in Shift-JIS. Up to 4 address fields are available, each with a limit of 20 full-width or 40 half-width characters.
Why does a CSV made on a Mac show garbled text?
If the CSV was saved in an encoding other than Shift-JIS, it may show garbled text or an import error. Check the file encoding and save it again in Shift-JIS as stated in the official guide.
How do I fix an address-length error?
Each of address lines 1 through 4 must be within 20 full-width or 40 half-width characters. Split a long address across fields in a readable way, then check the character count in each field.
What should I do if a CSV exceeds the 40-item limit?
The official guide allows up to 40 items per CSV upload. Split the order rows so each file has no more than 40 items, then upload the files separately.
Compare the CSV with the official template and the message on the Click Post screen before uploading. To learn about creating a CSV from Shopify orders and reviewing and registering tracking-number candidates from the original label PDF, see the app's Shopify App Store listing and app guide.